This is a quick fix to my Whirlpool oven won’t turn off. Why would you have an issue with your oven turning off? It seems to be an easy fix, but before we start, we will discuss the possible causes, then how to fix it. But first, why will the Whirlpool oven won’t turn off?
This could be a faulty circuit breaker or fuse box, wiring, nicks or tears in the power cord, bare metal, exposed wires, a thermocouple or thermometer element, or bake element(s).
Reasons why a Whirlpool oven won’t turn off
Whirlpool ovens won’t turn off for numerous causes. For example, the power supply cord may be broken, or the power switch may be defective. To find out which problem your oven might have, please read the following troubleshooting guide:
- Check if the power has been turned off at the circuit breaker or fuse box, and then turn it back on.
- Ensure all the wiring is connected correctly by using an electric meter for testing purposes. Also, make sure that there are no exposed wires when doing so.
- Look for nicks or tears in the power cord. Also, while you’re at it, look if there’s any bare metal that has to be covered up.
- If you have a power supply cord, check if there are any exposed wires and if they’re adequately grounded. Ensure that the plug is secure and that you have connected it correctly via an electric meter.
- Next, remove the lower part of your oven, including the fan, thermocouple/thermometer element, and bake element(s).
- If you have a lower oven bake element, check if there are any exposed wires and if they’re appropriately grounded.
- Lastly, ensure that there are no extra switches or knobs underneath your lower oven section.
- If none of the above steps assist you in determining the problem, there could be more than one issue. This includes potential issues with the thermocouple/thermometer and lamp assembly and possible issues with the bake element.
How to Fix a Whirlpool oven that won’t turn off.
Here is a possible solution for the Whirlpool oven not turning off. But first, carry out these checks on the stove.
- Your Whirlpool appliance has power.
- Your circuit breaker is turned on.
- You have a working range hood fan or vent so combustion gases can escape while your appliances operate.
- You have a working battery for the range hood fan.
- The wiring is not touching or pinched in the vent or the range hood.
- You have replaced all gas connections and gas lines.
- You have replaced all electrical connections to your stovetop.
- One last check, can you smell gas? If so, you will need to replace your regulator/valve assembly.
- You have a working electrical outlet that you plug into.
- The last check, plug something small into the outlet, a lamp, or one of those “tester” plugs with two round prongs. Something that you know will work and is powered by electricity.
- Use a wire to check the circuit breaker for any tripped breakers or other bad electrical connections.
- Confirm that the outlet is working by plugging something small into it.
- If you can start your stovetop or range, that is all the work we need to worry about; if not, read on.
We have just confirmed that the circuit breaker is good and that there is power going to both outlets. We have also tested for gas leaks using a wire with a battery-operated tester from Amazon. This showed no trip, and this test can be performed anywhere in your home with a working outlet.
This is because problems are often not electrical; they are often gas leaks. We will be testing for gas leaks later. It’s handy to have your oven taken apart like this so you can make the repairs in your home rather than at the repair shop.
If you have a gas oven, use that wire from before and place it in your gas oven’s pilot flame; also, check for electrical problems. If your range is electric and you don’t feel comfortable using the wire as a tester, then use it as a regular tester to see if you have power going to the stovetop. The stovetop will be warm but do not touch it.
Make sure you turn the oven to about 900-1000 degrees F. Next, you should turn off the range hood fan. Next, try turning on the stovetop; skip this step if it won’t start. If your stovetop does not light within 10 seconds, turn it off and move on to the next step.
Ensure the gas is turned off and working.
Next, we want to ensure that the gas is turned off and everything is working correctly.
Ensure the burner control valve is stuck closed, so we need to blow open the valve. You will see a little chisel-looking thing on the stove called a “T” handle. This is where the wire test comes in handy. If you have a broken stovetop burner control knob, then you can use this to check for gas leaks and electrical connections.
Use some pliers to unscrew the T-handle from the burner; It’s held on very tightly; try not to force it, or you risk breaking it.
Now we need to unscrew the range hood fan.
We do this by going around the back of the range hood and unscrewing the screws. The fans look different for each type of stove, but you should be able to figure this out; if not, look for screws on the back, inside or outside, and remove them.
- Now that our range hood fan is off, we need to get into it and test for gas leaks using a wire tester again.
- Now that you have tested your range hood and found no leaks, then we will go ahead and start removing the burners.
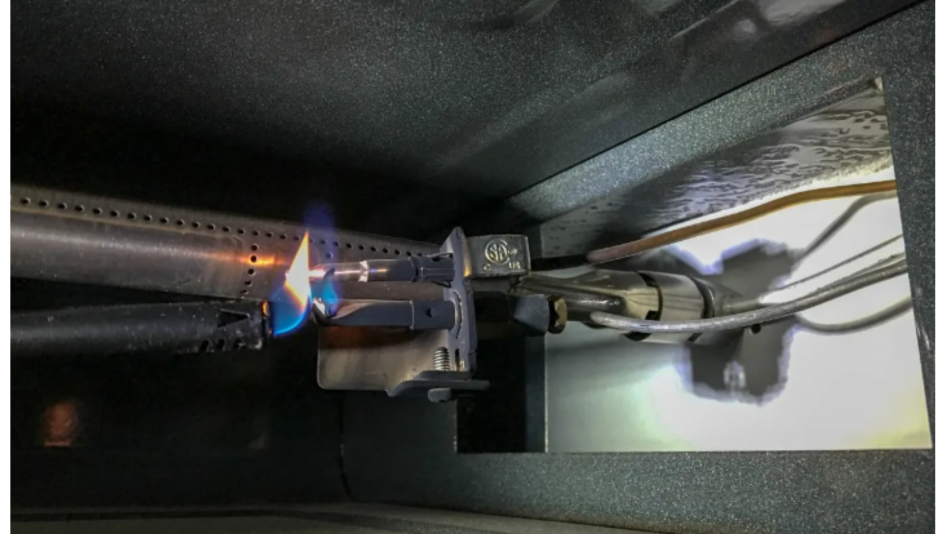
- Now that we have gas coming out of the gas valves use your wire to check for electrical problems.
It is hard to see, but this is supposed to look like a circuit breaker protecting stove top burner. The left burner is on, but all three are not lit, meaning there is a short somewhere.
Make sure that all three burners are functioning by using your wire to check for electrical problems or gas leaks. If you see gas or electricity, this means you have a problem somewhere and need to go ahead and fix it now.
Take out the burner control valve.
We now want to remove the burner control valve assembly under your stovetop burners. Lift the right side of your range hood, remove one burner cover screw, and lift the cover.
Using a screwdriver, remove the burner knob. Now that we have the burner plate off, we can start working on the gas control assembly. Remove all three screws. Next, open the control valve using a flathead screwdriver and check for electrical problems or gas leaks.
Once you have checked, you can remove one of your burners. Once removed, you will notice that a couple more screws are holding your burner assembly in place. Unscrew them and remove your main burner assembly.
Now that you have the main burner assembly removed, test for gas leaks or electrical problems. To check for gas leaks, place the small wire tester on the gas exhaust line and turn on the stove; if no gas is coming out of the stove, this is a good sign that all connections are adequately sealed.
To check for electrical problems:
- Run a wire all over the burner assembly on every connection to see if there are any bad electrical connections.
- Turn on your stovetop and make sure that when it comes up and reaches about 900-1000 deg F, then close your oven door.
- Leave this burner turned off, but remove all three screws from your main burner assembly and replace them with the ones you just removed from under it.
To take out the burner, you first need to remove the glass cover; all you have to do is put your flathead screwdriver into the screw and turn it counterclockwise, and then it will pop up. Then place your fingers behind and close it.
Now that your cover is off, you can slide a metal utensil under your burner assembly to get at these screws underneath.
Go ahead and remove the screws from underneath the burner. This will make it easier to put the new burner plate on. The front glass cover may be replaced by simply sliding it down over the burner assembly and screwing it back into place once the screws have been removed.
Before we install our new burner plate, we need to go ahead and put the burners back together.
Install your new burner plate.
Install your new burner plate with a product description from your dealer. You will hold up the main burner in the back with four screws and connect the other two burners with three screws.
Now that you have installed the third and last burner assembly, ensure that it works correctly and that there are no bad electrical connections. For example, instead of putting a wire tester onto the gas exhaust line, which in this case is directly on the gas valve, put it into a small bottle of water. Once you get it in the water, close the oven door and watch to see if any water leaks.
Try the burners as you go along, but for now, go ahead and turn the stove on. Once you have checked for gas leaks or electrical problems, put the burner back together by reconnecting the respective screws.
Now that we finished with our burner assembly, we can replace it in its original place using a flathead screwdriver. First, replace all three screws you removed before and make sure they are tight. Then, replace the glass cover, and you are finished!
Install my new oven light bulb.
After finishing the burner assembly, install a new oven light bulb above the control valve assembly. This will be a much easier task as everything has been installed and is working correctly.
The first step is to remove the old oven light bulb by pushing in on the metal tab on top of it, then pulling it up and off. Then, to get a new oven light bulb, check Amazon for the exact type of your oven. The next thing is to replace the original screws with longer screws to secure the glass cover so that there are no chances of any screws coming loose and causing significant damage. Then another screw secured the cover onto the control valve assembly.
- These two screws will secure the burner plate in the back of the stove over these holes.
- Use another screw to hold these burner connections in place so they don’t come loose and cause some damage.
- Use the last screw to hold the burner together with its glass cover.
Install the control valve.
Then install the control valve assembly, which is on the right side of my stove. Ready to install the new control valve assembly using a flathead screwdriver. Next, install a new control valve assembly, just like before. The last step is to replace the two screws with longer ones so they don’t come loose.
The final step is to conduct tests to guarantee that there are no leaks and everything operates as intended.